
Jewelry Rendering Mistakes to Avoid as a Designer
In jewelry design, CAD software is now a must-have tool. It helps you create detailed ideas with high precision. The mix of art and technology gives you a new way to express your creativity. But, turning a design from your screen into a real piece is not always easy. It is common to run into problems. If you want your jewelry to look good and be ready for production, you need to know about the common mistakes designers make during the jewelry rendering stage. This first step helps your jewelry design stand out and shine.
What is Jewelry Rendering and CAD Design?
Jewelry rendering and CAD (computer-aided design) are two very important aspects in the design process today. It uses special CAD software to make 3D pictures and video animations that look real. These show rings, necklaces, and other jewelry or creative products.
It is not just drawing on a computer; it’s CGI jewelry (Computer-Generated Imagery). This is an art form that lets you make items that look good and are right for the jewelry industry to showcase products. You get lots of creativity and precision with this process. However, people often make common mistakes when working with CAD software. These mistakes happen when the digital design does not match what can be made in real life.
Sometimes, the lighting looks fake. Other times, the design is not possible to build. This is why it is very important to know how to use the tools in CAD well.
The Role of Accurate Visualization in Jewelry Design
Accurate visualization is one of the top benefits of using CAD software. It lets you, your team, and your clients see what a design will look like, in real 3D, before you make anything. If you want to check how a center stone looks, or you need to change the width of a band, you can do this with just a few clicks. You get to preview these changes right away. This makes design work smooth, as you can try out many design ideas fast.
You need this kind of precision when working with things like stone settings and matching patterns. A detailed view from a CAD jewelry designer can show even the smallest measurements, down to a millimeter. Getting these details right is very important for perfect jewelry. To be sure your jewelry render is true to the final piece, you should compare the digital model’s size and details to regular sizing guides and standards. Every part should match your plan for how it will look in real life.
Having a precise digital render from a CAD jewelry designer is like having the full plan for your piece. It can help you find problems early. That stops you from making expensive errors and helps your final jewelry come out just how you wanted.
How Rendering Impacts Manufacturing and Final Product Appearance
A rendering is not just a nice picture. It is an important part of the manufacturing process. When you do a good render, you help make the real piece of jewelry. The design needs to look good and be possible to make. You need to make sure the parts of the jewelry work well for casting. There must be enough room for the setter to put in the gemstones.
How do you avoid common mistakes in jewelry rendering? You need to learn the limits of wax printing and resin casting. You should know what the setting tolerances are, too. If your design looks perfect on CAD but does not take care of these details, the real piece of jewelry might not work. For example, if the prongs are too thin in the render, they will not hold the stone well after casting.
Think about the full process when you are working in CAD. This helps you avoid big problems. When your rendering has all the details, you talk better with people who make the jewelry. Doing this means you need fewer changes, and the final piece looks just like you wanted. This helps the jewelry be as good as the digital design.
Common Jewelry Rendering Mistakes Designers Make
Even with good rendering software, the design process can be hard for people who are new to it. There is a learning curve for many. It is easy to make common mistakes or fall into pitfalls at first. Lots of designers, even if they use CAD, sometimes do things that hurt the quality of the final render. This can affect the look of the real thing, too. These common mistakes can show why jewelry renderings do not always match the final product.
If you know about these common mistakes in the design process, you can make your work better. Working with a CAD file means there are technical things to watch for. Also, not thinking ahead about what will happen in production can lead to problems. You have to think logically, but also have to stay creative in the role of a jewelry designer. These mistakes can make a great design idea turn out not so good. Next, you will see which issues come up with lighting, scale, and detailing.
Issues with Lighting, Reflections, and Shadows in Renders
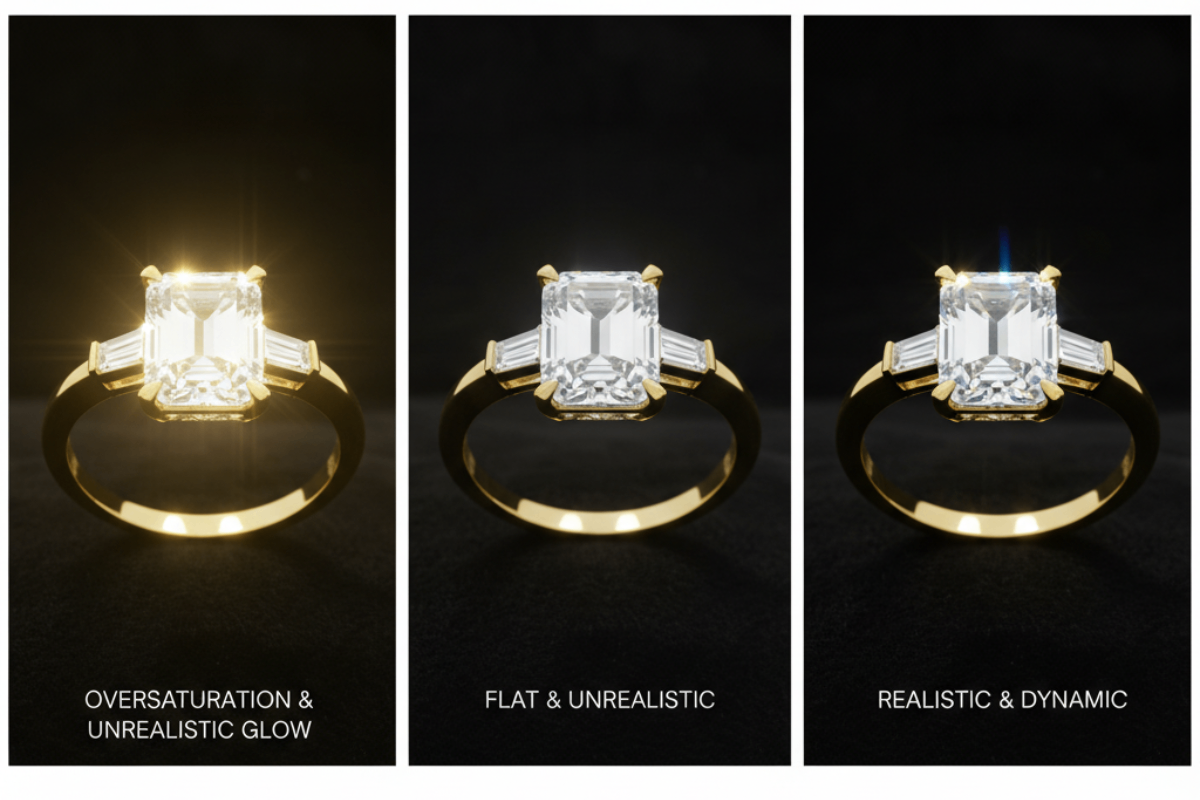
Lighting, reflections, and shadows put life into any digital model. They are where a lot of designers slip up. If the lighting is wrong or missing, a render can look flat and not real. This takes away the natural sparkle that gemstones should have and the shine that metal should show. At the same time, bad or strong reflections can pull your eyes away from the main parts of the jewelry.
Rhino, along with its plugins, can be great tools to help with this. Still, it’s easy to do too much. When colors are too strong in the render, both gemstones and metal can start to look cheap. Adding too many filters can also make small, important details hard to see. Before you finish a design, it helps to talk over the rendering steps with your jeweler. You want to be sure the image you make matches up with what your jeweler can really produce.
Common mistakes with lighting and reflections are:
- Overediting: If you use too many effects, the image can get twisted and not look real.
- Oversaturation: Turning up the colors too much can take away from the good look gemstones and metals should have.
- Unrealistic Glows: Putting in that “dreamy” light glow can wash out details and drop the sharpness in your image.
Mistakes with Scale, Proportion, and Detailing
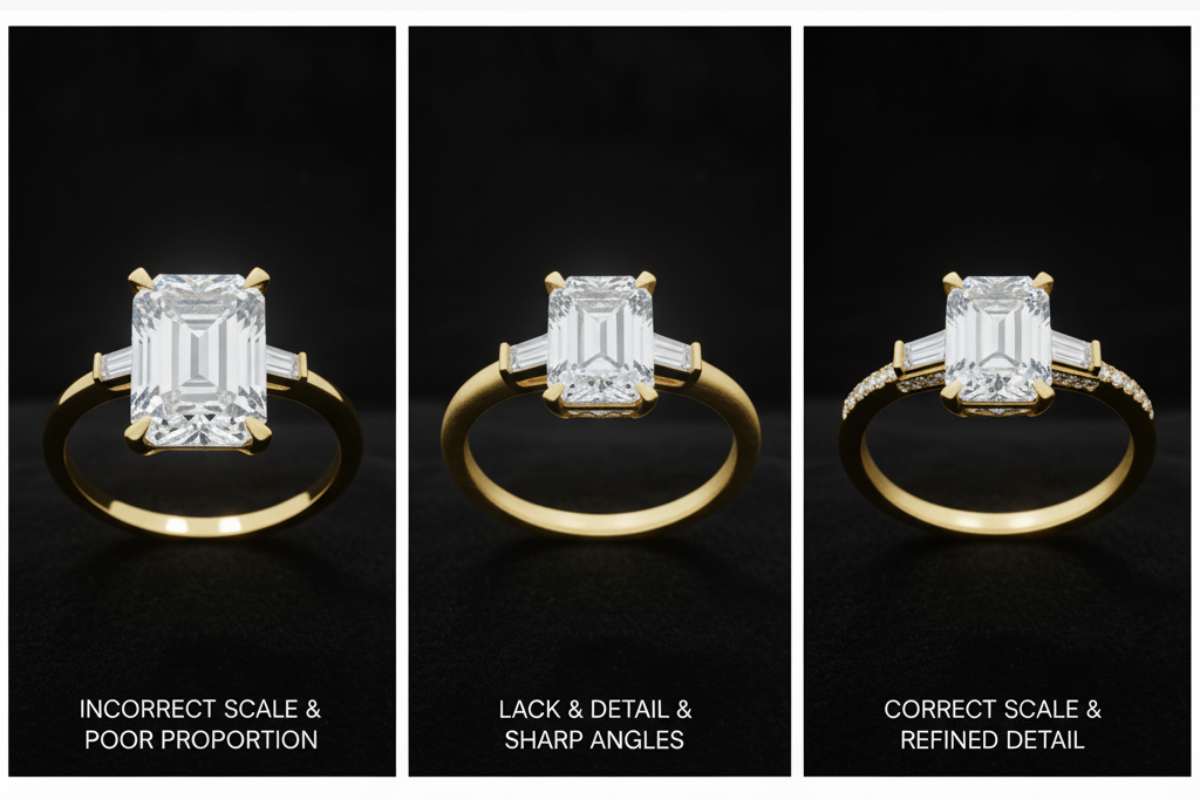
Designing in a digital space can make it easy to lose sight of real-world scale and proportion. A common mistake is creating a piece that looks great on screen but is awkward or uncomfortable when worn. For example, placing a massive stone on a very thin band can compromise both the look and the structural integrity of the ring.
A lack of detail is another significant error. Failing to render the fine texture of the metal or the precise facets of a gemstone can make a piece look unrefined and amateurish. Conversely, trying to add too much detail can make a design feel cluttered. It is also crucial to avoid sharp angles and unclean surfaces in your STL file, as these can cause problems during manufacturing and result in a poor finish.
Thinking about how rendering mistakes can lead to improvements is useful. A render that reveals poor proportions may force you to create a more balanced and durable design.
| Rendering Mistake | How to Correct It |
|---|---|
| Incorrect Scale | Use virtual mannequins or hand renders to check real-world size. |
| Poor Proportions | Compare your design to standard sizing guides for balance. |
| Lack of Detail | Zoom in to refine metal textures and gemstone facets. |
| Sharp Angles | Bevel all edges to ensure a smooth, manufacturable finish. |
Overcoming Production-Related Rendering Errors
Many design errors happen because people do not think about how the item will be made in real life. A piece may look perfect in CAD, but if you ignore how it will be put together, it will not work. These problems can cause high production costs and slow things down. Sometimes the product does not turn out as planned, so it fails to make people happy. For example, the finished piece can be fragile or not feel good to wear.
For example, a render may not show that the prongs are too thin for a setter to handle. Or it may hide that fine details cannot be cast neatly. When you design jewelry, you have to think about every part of the process. This spans from the casting work to the final polish. The next parts talk about how to make sure your design will last and why you should keep away from making things too hard.
Factoring Polishing and Durability into CAD Models
A nice design is no good if it can’t last through the day. Many people make mistakes when making jewelry. They use parts that are too thin. Bands and settings can break fast if they are not thick enough. As a good rule, bands or walls should not be below 0.8 mm thick, unless they are only for decoration. When starting with CAD software, like MatrixGold, this mistake is very common.
Polishing matters too. People often skip thinking about it when using CAD for a design. If the parts are too close to each other, there might not be room for tools to shine the surfaces. Then, the jewelry can look flat and not finished. Every CAD drawing has to give space so that each part can be polished well after wax casting.
True simplicity in jewelry design is more than how it looks. It needs to be fine, easy to make, and simple to wear. If you think about making the piece strong and about polishing from the start, you can use CAD software and see your digital idea turn into lasting and high-quality jewelry every time.
Avoiding Complicated Designs That Hinder Manufacturing
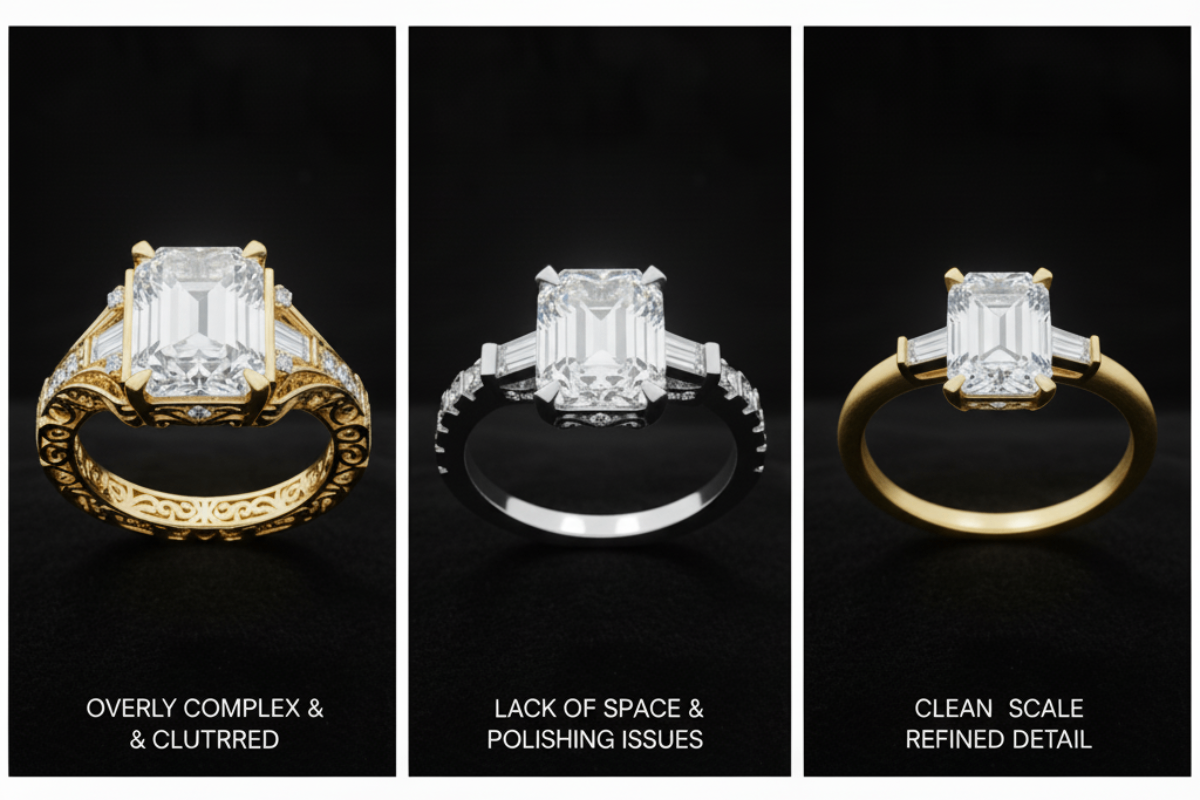
CAD software lets people make very detailed designs, but too much detail can create big problems when making the real thing. If you add a lot to a design, it can start to look crowded. This can lead to trouble with casting, putting together, and finishing the product. It will also make the cost go up, and sometimes the product may not be easy to make over and over. That can hurt sales and make things hard for any business that uses CAD software.
Keeping your design simple often leads to jewelry that stands the test of time and is easy to make. Simple, well-shaped designs usually look better and work better than busy ones. Always check if every part of the design needs to be there. This is important when you use white gold, as it is harder to work with if the item is too complex.
Here are some ways to make your designs simpler for better manufacturing:
- Focus on clean lines and basic forms first.
- Use preset elements like standard stone settings to save time and ensure the design can be made.
- Avoid creating designs that cannot be easily cast or printed.
- Ensure there is enough space between elements for polishing and setting.
FAQs
How do I check if my jewelry rendering matches the real piece?
To check if your jewelry rendering is correct, you need to review the measurements in the CAD file and compare them with a real prototype. You should also make sure that the details in the STL file match up. Look at the thickness of the prongs and the width of the band. These need to be close to the real piece of jewelry for good results with your CAD and to keep the right precision.
Why do renderings sometimes differ from finished jewelry?
Renderings might not match the final product because of the manufacturing process. When steps like wax casting, polishing, and putting in gemstones are done, the size and look can change a bit. The natural look of gemstones can also make each item appear different. So, it may not look the same as the digital drawing, which is often more even.
What are quick fixes for common jewelry rendering mistakes?
When looking at common mistakes, you should keep your design ideas simple so they match how things are made. Use plugins in your CAD software to help with the lighting and texture in your work. The best step you can take is to show your renders to an experienced CAD jewelry designer or your own jeweler and ask for feedback before you move on to making the piece.